Create your own PKI
To replace the BALTECH default certificates with your own, unique ones, you need to create your own PKI. There are 2 approaches:
- openSSL
- BALTECH PKI Certificate Manager (for testing only)
openSSL
This method requires in-depth PKI knowledge. We recommend it if you already have a PKI or need full control over its structure, e.g. to integrate it in a larger workflow. For this how-to, we assume you are familiar with openSSL. If you need an intro to the topic, please refer e.g. to these tutorials.
Readers can be integrated in up to 3 PKIs. This is needed if you have multiple applications accessing the readers and want to assign different permissions to each application. Then you create individual sets of certificates and keys with the respective permissions for each application.
Create Certificates
Create the following keys and certificates for host and readers.
The signing key must use the elliptic curve NIST p-256 ( learn more).
For the host:
- Root certificate
-
Complete certificate chain including key pair and signed end entity certificate
For the readers:
- Root certificate
- Certificate chain except end entity certificate
The readers are already equipped with individual key pairs; their end entity certificates will be signed in the next step.
Store certificates on the reader
Make sure you set up the readers before you deploy the Ethernet host interface component as part of the reader configuration. Otherwise, access to the readers may be blocked.
To equip the readers with the required certificates, connect to each reader and run the following commands:
- Run Pki.GetX509Csr to receive a certificate signing request (CSR) from the reader, so you can sign the reader's end entity certificate with your CA.
-
Run StoreX509Cert to write the signed end entity certificate back into the reader. Due to storage limitations, the reader cannot hold its entire certificate chain. Instead, you need to later store it on the host.
Security level
You need to specify a security level here. This can be 1, 2, or 3. If you create only one PKI for your network, we recommend you use the value 1. If you create different PKIs for different applications, use a different value for each of them. The number specified here must match the security level specified in the host application. -
Run StoreX509RootCert to store the host's root certificate on the reader.
Store key and certificates on the host
In the host, store the host key pair, the host certificate chain, and the reader certificate chain. The host then passes both certificate chains when establishing a connection.
To connect from a BALTECH tool, you need to create a PKI package that you can load into the tool.
BALTECH PKI Certificate Manager
With our software tool BALTECH PKI Certificate Manager, you don't need any special knowledge to create your own, simple PKI.
PKI Certificate Manager has been deprecated
Please only use it for testing purposes, but not to create a PKI for productive use.
Create PKI project
A project includes the certificates and keys needed by the host to get a defined set of permissions when connecting to the readers.
You can create up to 3 projects for the same readers. However, this is only needed if you have multiple applications accessing the readers and want to assign different permissions to each application. In all other cases, 1 project is enough
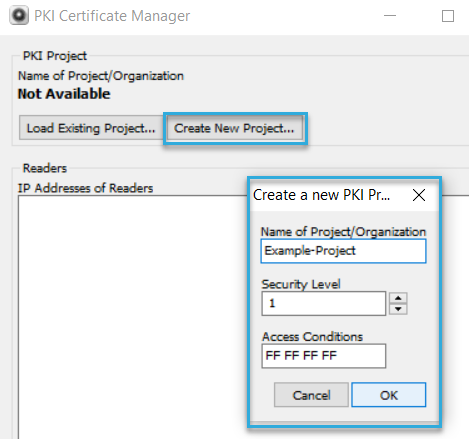
To create a PKI project:
-
Open the latest version of BALTECH PKI Certificate Manager.
-
Click Create New Project and enter a Name.
-
Enter a Security Level.
This can be 1, 2, or 3. We recommend you keep the value 1. If you create different projects for different applications, assign each of them a different value.The number specified here must match the security level specified in the host application.
-
In the Access Conditions field, the permissions are specified as a bitmask. The default value FFFFFF means that the host will have full permissions when establishing an authenticated and encrypted connection to the reader.
If you want to restrict permissions, please get in touch for assistance, or refer to this bitmask description. (A more convenient representation of access conditions is planned for a future release.)
-
Click OK.
-
Enter a folder name. We recommend you use the same name as for the project.
-
Save.
PKI Certificate Manager will then create the new folder with the following content:
-
ZIP file
The ZIP file, also referred to as PKI package, includes all certificates and keys for reader-host connection. You'll need it later to set up the host. When connecting to a reader from a BALTECH tool, you'll need to load the ZIP into the tool.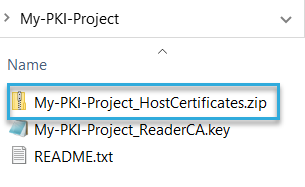
-
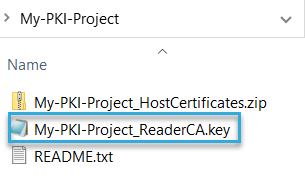
KEY file
This is the key for your PKI certificate authority (CA). It's only needed by BALTECH PKI Certificate Manager to set up readers in the next step.
Both files contain sensitive keys!
- Keep them in a safe place and don't share them via insecure channels, e.g. unencrypted e-mail.
- The KEY file is not needed for daily operation. Do not store it in the host.
Set up readers
Now that you've created your PKI, you need to equip the readers with the required certificates. This ensures they later accept authenticated and encrypted connections from your host only.
Make sure you set up the readers before you deploy the Ethernet host interface component as part of the reader configuration. Otherwise, access to the readers may be blocked.
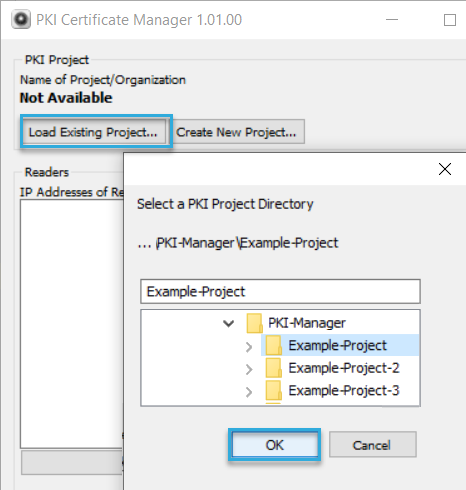
To add readers to the PKI:
-
In BALTECH PKI Certificate Manager, click Load Existing Project and select the project folder you've created.
-
Specify the readers you want to add to the PKI. To do so, you have 2 options:
- To search for readers in the network, click Search and select the relevant readers.
This only works within the same subnet and requires SLP to be enabled on the readers. - Enter the readers' IP addresses manually as a comma-separated list.
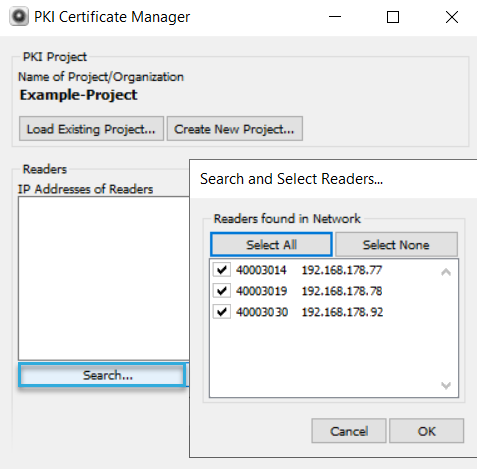
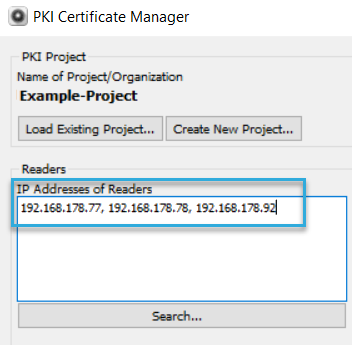
- To search for readers in the network, click Search and select the relevant readers.
-
Load the PKI package for the PKI that the reader currently belongs to.
For out-of-the-box readers, this is the ZIP file PKIAUTH_BALTECH_DEFAULT.zip , available on our website. If the reader has already been added to a custom PKI before, load the respective PKI package (learn more about PKI packages). -
Click Update All Specified Readers.
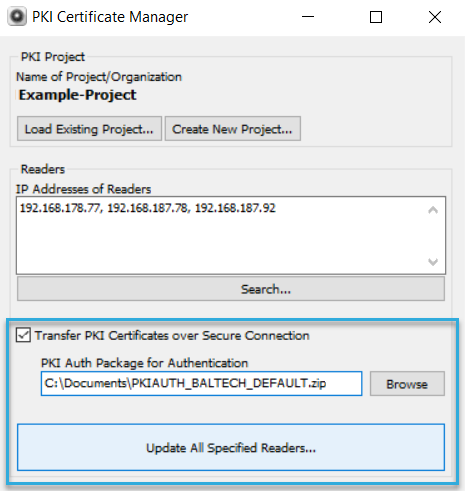
PKI Certificate Manager now connects to each reader in the list and store the required certificates on them. Depending on the number of readers, this may take some time.
Set up host
In the host, store the entire content of the ZIP file, also referred to as PKI package, that was generated by BALTECH PKI Certificate Manager when you created the PKI. This will allow the host to establish a PKI-authenticated and encrypted connection to the readers.