Set up offline access control via a whitelist or blacklist
Usually, readers send numbers they've read from cards to a host system that decides about subsequent actions. However, there are access control setups with no host system involved (offline access control). Here, you can configure readers to autonomously switch a relay and thus open a door when a card with an allowed project number is presented. You can specify allowed numbers in the reader configuration via a blacklist or whitelist.
This feature requires BALTECH ConfigEditor v5.00.07 or above. It replaces the Blacklist or Whitelist component included in previous versions.
Add Offline Access Control component
We recommend you create your configuration using Autoread Wizard. Here, select Offline Access Control in the Host Interface section.

To add the component manually, click the Plus icon > Host Interface > Offline Access Control.

If you add it manually, make sure you also add an Autoread component for your card type.
Whitelist or blacklist?
| List type | Use case | How it works | Example: Issuing a new card | Example: Blocking a lost card |
|---|---|---|---|---|
| Whitelist | Allow only a few numbers | Specify each number individually. All other numbers are automatically blocked. | Add the number to the list. | Remove the number from the list. |
| Blacklist | Allow a large range of numbers | Specify the range of allowed numbers. All numbers outside this range are automatically blocked. In addition, you can have a list of individual numbers to block within the allowed range. | Check what's the next unused number from the range of allowed numbers, and use it for the new card. | Add the number to the list of individual numbers to block. |
Create a whitelist
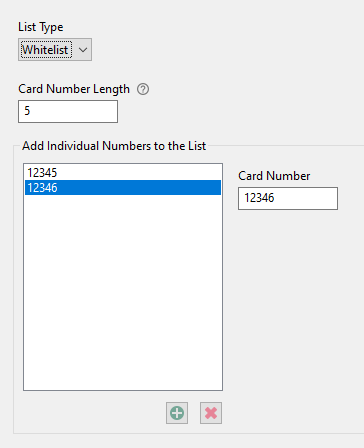
- In the List Type dropdown, select Whitelist.
-
In the Card Number Length field, specify how many digits your card numbers consist of.
If you read programmed card numbers (PCN), this value must match the PCN Length in the Autoread Number in File/Sector/Segment component.
-
To add a new allowed card number to the whitelist, click
 at the bottom of the input box
and enter the number.
 - To remove a card number from the whitelist, e.g. because the card has been lost,
click the relevant entry, then click
 at the bottom of the input box.

Create a blacklist
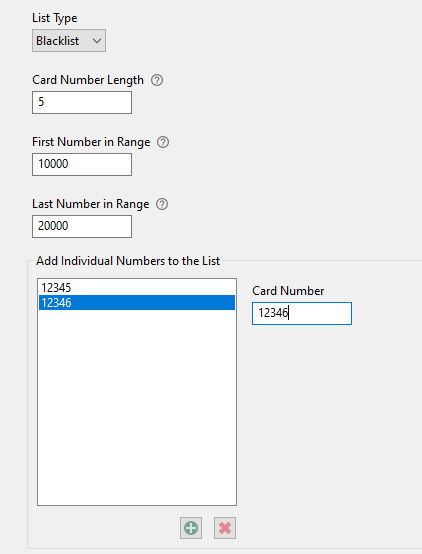
- In the List Type dropdown, select Blacklist.
- In the Card Number Length field, specify how many digits your card numbers consist of.
This is the length as defined in the PCN Length field of the Autoread Number in File/Sector/Segment component. - In the First Number in Range field, enter the smallest number in the range of allowed project numbers.
In the Last Number in Range field, enter the largest number in the range of allowed project numbers. Thus, all numbers outside this range are automatically blocked. - To additionally block an individual number within the range of allowed project numbers,
e.g., because the card has been lost,
click
 at the bottom of the input box and enter the number.
 - To remove an individual number from the blacklist, e.g. because the card has turned up again,
click the relevant entry, then click
 at the bottom of the input box.
Example: In the following screenshot, all numbers between 10000 and 20000 are allowed. This is the range to use when issuing cards. The numbers 12345 and 12346 have been added to the list of individual numbers to block, as these cards have been lost.

Action on Card Accepted
In the Action on Card Accepted section, specify what you want the reader to do when a card with an allowed project number is presented, e.g. enable a relay with a specific toggle time and enable the beeper to provide feedback to the card holder.
