ID-engine Z BRICK & BRICK SET installation guide
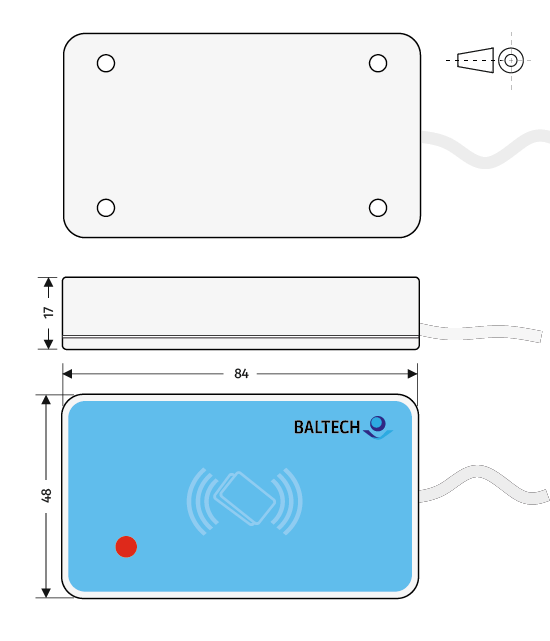
Dimensions

Dimensions in mm. Tolerance +/- 1 mm. Drawing not to scale. Mounting holes centered, distance 64x34 mm, 4 mm diameter
Mounting
ID-engine Z BRICK
As an option, you can fix the reader in the desired position using velcro tape or double-sided adhesive tape.
ID-engine Z BRICK SET
Overview of parts:
A) Top part
B) Bottom plate (can be screw-mounted if required)
C) Reader module
D) Host interface cable
To assemble & mount an ID-engine Z BRICK SET:
-
Connect the host interface cable to the reader module:
- Position the reader module so the larger side (where you can see the antenna) is facing down.
- Insert the Molex connector of the cable with contacts facing down until it clicks.
-
Fit the reader module into the top part of the housing.
If you want to screw-mount the bottom plate, we recommend you fix the module in the housing with double-sided tape.
-
Route the cable through the appropriate U-shaped strain relief feature.
Use the narrow feature for cables with a diameter of up to 4 mm and the wider one for larger diameters. -
If required, screw-mount the bottom plate using countersunk head screws M3.5.
-
Fit the top part of the housing on the bottom plate, so that the loops engage the taps.
-
Press the cable end of the housing down, so the parts snap together. No tools required.
To disassemble an ID-engine Z BRICK SET:
Firmly pull the parts of the housing apart while pushing a flat-bladed screwdriver into the release slots.
Deploy configuration
- If you want to read HID Prox, Indala, or Keri project cards, and your readers don't have a Prox license yet, deploy a Prox license using BALTECH LicenseCard.
- If you have a project configuration, deploy it using one of these deployment methods.